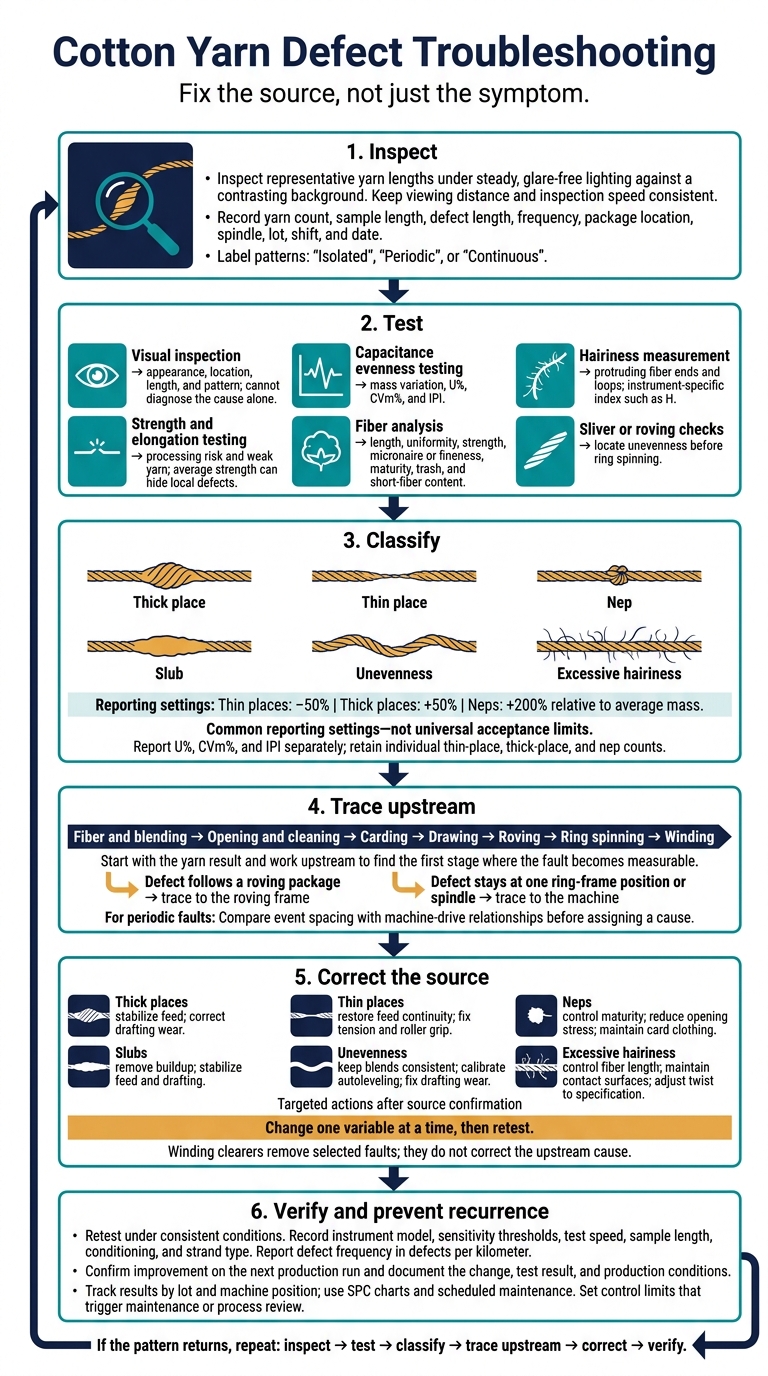
To prevent cotton yarn defects, I start by finding where they first appear - not by changing settings at random. I check six faults: thick places, thin places, slubs, neps, unevenness, and excessive hairiness.
My approach is simple:
- Identify the fault: Inspect yarn and test mass variation, hairiness, and strength. Common reporting thresholds are −50% for thin places, +50% for thick places, and +200% for neps - not acceptance limits.
- Trace the source: Compare fiber, sliver, roving, and yarn results to separate cotton-quality problems from machine faults.
- Correct and verify: Check blending, carding, drafting, spinning, winding, and machine-level humidity. Change one variable at a time, then retest.
- Prevent repeat faults: Keep test conditions consistent, record results by lot and machine position, and use control charts and scheduled maintenance.
My rule: <u>fix the source, not just the symptom.</u> Winding clearers can remove selected faults, but they cannot correct the process that caused them.
Cotton Yarn Defect Troubleshooting: Identify, Trace, Prevent
Defects Due to yarn. Irregular yarn | 31/87 | UPV
sbb-itb-0e617ca
Identify Yarn Defects Through Inspection and Testing
When a defect appears, identify its signature before tracing its source. A yarn defect is a local or continuous fault in mass, diameter, surface, or structure. Visual inspection reveals the symptom, but not always the cause. A thick spot, for example, may start with opening, drafting, or winding faults. The goal is to find the first stage where the fault becomes measurable.
Compare 6 Common Yarn Defects
| Defect | Appearance | Test signal | Most likely stage | Effect on fabric or processing |
|---|---|---|---|---|
| Thick place | Local section visibly heavier or wider than normal | Positive mass deviation; commonly counted at the +50% thick-place threshold for IPI | Carding, drafting, spinning, or winding | Barre, streaks, increased breakage, and poor fabric appearance |
| Thin place | Local section narrower or visibly weak | Negative mass deviation; commonly counted at the -50% threshold | Drawing, roving, drafting, or spinning | Weak spots, end breaks, holes, and streaks |
| Nep | Small, compact fiber knot or seed-coat fragment | Small, dense mass event; commonly counted at the +200% threshold | Opening, cleaning, carding, or immature-fiber processing | Specks, dye-point defects, and uneven fabric |
| Slub | Long thick place | Large positive mass and diameter deviation, often with a longer event length | Poor drafting, roller lapping, fiber entanglement, or winding | Major visual faults and loom or knitting interruptions |
| Unevenness | Repeated or general variation in yarn mass along its length | U% or CVm% | Any stage from blending through spinning | Variable strength, dye uptake, fabric cover, and processing performance |
| Excessive hairiness | Fiber ends and loops protruding from the yarn surface | Hairiness index such as H | Fiber length distribution, spinning, or winding | Pilling, fuzz, abrasion, lint, and poor fabric clarity |
These thresholds are common reporting settings, not universal acceptance limits. Hairiness uses an instrument-specific index, so acceptable mass uniformity does not guarantee smooth yarn.
Inspect Yarn and Record Defect Patterns
After naming the fault, map where it appears and how often. Inspect representative yarn lengths under steady, glare-free lighting against a contrasting background. Keep the viewing distance and inspection speed consistent.
Record yarn count, sample length, defect length, frequency, package location, spindle, lot, shift, and date. Mark each pattern as isolated, periodic, or continuous. Before changing settings, compare affected and unaffected spindles, packages, lots, and shifts. For periodic faults, check event spacing against machine-drive relationships before assigning a cause.
Use the pattern to select the most targeted test that can confirm the cause. Visual clues guide test selection; test results confirm the fault.
Choose Tests for Yarn, Fiber, Sliver, and Roving
Test in stages to trace the fault through the process:
| Test or check | Purpose | Main limitation | Best use |
|---|---|---|---|
| Visual inspection | Confirm defect appearance, location, length, and pattern | Subjective; cannot diagnose the cause on its own | Screening and defect mapping |
| Capacitance evenness testing | Measure mass variation, U%, CVm%, and IPI | Requires controlled settings and comparisons using consistent methods | Yarn, sliver, roving, and process-stage diagnosis |
| Hairiness measurement | Measure fiber ends and loops | H values depend on instrument design and settings; verify before comparing methods | Confirming surface-related yarn problems |
| Strength and elongation testing | Determine whether thin places or drafting faults create weak yarn | Average strength can hide local defects | Validating processing risk |
| Fiber analysis | Measure length, uniformity, strength, micronaire or fineness, maturity, trash, and short-fiber content | HVI provides less detail than individualized-fiber systems | Raw-material and blending diagnosis |
| Sliver or roving checks | Locate unevenness before ring spinning and identify drafting or preparation problems | Samples must represent cans, bobbins, and machine positions | Locating the process stage responsible |
Report U%, CVm%, and IPI separately. Keep individual thin-place, thick-place, and nep counts so one fault type does not hide another. Use HVI for broad screening and specialized analysis for short-fiber, nep, and maturity problems.
Use a recognized capacitance-based evenness method, and verify which edition applies for compliance. For strength and elongation, use a recognized yarn-strength method and report the gauge length and test conditions.
Record the instrument model, sensitivity thresholds, test speed, sample length, conditioning, and strand type. Retain metric testing units, including defects per kilometer, and use the results to identify the process stage that needs correction.
Trace Defects From Fiber to Finished Yarn
Check Fiber Quality, Blending, and Preparation
Start with the yarn result and work upstream to the first process change. To separate fiber-quality defects from spinning defects, set blend limits for the yarn count, follow the blend recipe’s bale sequence, and keep fiber moisture steady. Micronaire reflects fineness and maturity - not quality alone. Check maturity data before rejecting low-micronaire cotton. Use bale and gin records to track changes, not assign blame.
Cleaning is a balancing act: too aggressive, and it creates short fibers; too weak, and it leaves trash. Compare the current blend with a previously approved blend while keeping machine settings unchanged. This helps separate material effects from machine effects.
Check Opening, Carding, and Drawing
If the fiber blend isn’t the source, check carding and drawing next. Review feed consistency, airflow, suction, and cleaning intensity. At each card, inspect the licker-in, cylinder, flats, doffer, wire condition, and transfer settings. Track card-sliver neps, sliver CV%, production rate, and waste together.
If card sliver stays stable but drawn-sliver variation increases, check doubling consistency, autoleveler response and calibration, roller alignment and eccentricity, top-arm loading, cots, and aprons where fitted.
Check Roving, Ring Spinning, and Winding
If carding and drawing are stable, move to roving, spinning, and winding. Measure temperature and relative humidity at the machines, not just at the HVAC panel. Use the equipment supplier’s limits and the yarn specification as your main reference. A typical ring-spinning range is 72–78°F (22–26°C) and 55–65% relative humidity.
Check roving linear-density variation, twist, tension, package build, and feed stability. If defects follow a roving package, trace them to the roving frame. If they stay at one ring-frame position or spindle, trace them to the machine. Inspect drafting settings, spacers, aprons, glazed or worn cots, roller pressure, travelers, and balloon control. Change one variable at a time, then retest.
At winding, compare clearer cuts against retained ring-spun samples by defect type, length, frequency, spindle, and time. Clearers remove selected thick places, thin places, and neps, but they don’t fix the upstream cause.
Match Yarn Defects to Causes and Corrections
Once you’ve traced a fault to a process stage, match the defect to its most likely cause. Keep comparisons consistent with the same USTER-style thresholds: thin places at −50%, thick places at +50%, and neps at +200% relative to average mass.
| Defect | Likely fiber causes | Likely machine causes | Targeted prevention |
|---|---|---|---|
| Thick places | Fiber clusters, poor blending, trash or seed-coat fragments | Sliver or roving variation, roller lapping, buildup, drafting disturbances, or autoleveler faults | Stabilize feed; correct drafting wear. |
| Thin places | Short fibers, variable fiber length, or poor cohesion | Interrupted feed, roller slip, unstable roving tension, or poor fiber control | Restore feed continuity; fix tension and roller grip. |
| Neps | Immature or tangled fibers, seed-coat fragments | Excessive opening stress, inadequate carding, damaged card clothing | Control maturity; reduce opening stress; maintain card clothing. |
| Slubs | Poorly opened clusters, irregular tufts, or contaminated cotton | Drafting faults, roving irregularity, roller buildup, or winding/joining faults | Remove buildup; stabilize feed and drafting. |
| Unevenness | Variable fiber length or fineness, inconsistent blending | Autoleveler errors, drafting waves, worn or eccentric rollers | Keep blends consistent; calibrate autoleveling; fix drafting wear. |
| Excessive hairiness | High short-fiber content, poor length uniformity | Unstable twist, poor drafting control, abrasion, worn travelers | Control fiber length; maintain contact surfaces; adjust twist to spec. |
Correct Thick Places, Thin Places, and Slubs
Treat unintended slubs as long thick-place events - not intentional novelty yarn. Use clearer data and evenness traces to distinguish isolated lumps from recurring feed variation. For thin places, check whether defect timing lines up with feed interruptions and end breaks.
Inspect a single problem position before changing settings across the machine. If the defect already appears in roving, correct the upstream cause before adjusting clearer settings.
Reduce Neps and Mass Unevenness
High nep counts in bale samples that persist through processing point to raw-fiber contamination or immature fiber. A spike after opening or carding points to excess mechanical action, poor card clothing, wire damage, incorrect flats or licker-in settings, contamination, or weak cleaning. Assess cleaning changes using all three measures: nep reduction, short-fiber content, and waste.
Track CVm or U% by stage, machine, position, lot, and time. Use the spectrogram to distinguish periodic faults from general unevenness. Keep conditioning, calibration, settings, and sample size constant so comparisons stay consistent.
Reduce Excessive Hairiness
Compare hairiness only with identical conditioning, speed, sample length, and instrument settings. Check short-fiber content and measured twist before increasing twist. Any increase must still meet strength, hand, count, and productivity requirements.
Check the twist multiplier, spindle speed, traveler size and wear, balloon control, yarn guides, and ring and traveler surfaces. After correcting abrasion or traveler wear, retest using the same method and check the result against strength and end-break data. Test after each correction to confirm its effect before changing another setting.
Conclusion: Verify Results and Maintain Yarn Quality
Once you’ve traced and corrected a defect, keep the process under control to prevent it from returning.
Set Quality Limits and Maintenance Schedules
Use SPC charts to monitor key yarn defects and evenness. Track previously identified patterns to spot recurring problems early.
Set control limits that trigger maintenance or a process review. Check settings and perform maintenance on a fixed schedule to catch machine faults and inconsistent fiber laydown early.
Use a Defect Troubleshooting Checklist
Follow the same sequence each time: inspect, test, classify, trace upstream, correct, and verify.
Check the improvement on the next production run. Before closing the record, document the change, test result, and production conditions. Repeat the sequence whenever a defect pattern returns.
FAQs
How do I set acceptable yarn defect limits?
Set your mill’s quality standards based on application requirements and global benchmarks. Use Uster Statistics to compare results for your yarn count and end use, then set limits to match. Track thick places, thin places, and neps with the Imperfection Index (IPI).
Keep testing conditions consistent and follow standardized protocols. Review winding and testing data regularly to spot bottlenecks and adjust process settings to stay within your control limits.
Which yarn defects should I fix first?
Check raw cotton quality and carding first. These are the most common sources of systematic faults, including fiber irregularities, thick and thin spots, and unevenness. Downstream processes like doubling can’t fix these problems.
If both areas are stable, check for mechanical issues, which account for 50–60% of yarn faults. Inspect drafting rollers for eccentricity, and keep components aligned and maintained so defects don’t create more waste.
How much yarn should I sample for reliable testing?
The amount you sample depends on your quality standards and machinery. Take samples from the top, middle, and inner sections of yarn cones. Use the same sampling and testing procedures each time.
Keep testing conditions stable, typically at 50% relative humidity, so results reflect yarn mass variation and imperfections. Follow established industry standards, such as ISO 2649 or ASTM D1425, for consistent sampling and reliable benchmarks.